
Please Choose Your Language
Views: 0 Author: Site Editor Publish Time: 2026-09-29 Origin: Site


Moving from basic food preservation to precision dehydration requires a fundamental shift in operational control. Relying on ambient air or inconsistent oven temperatures often leads to compromised yields. You need a controlled environment to optimize output, retain nutritional profiles, and extend shelf life safely. Without exact temperature and airflow management, operators face recurring failures. Case hardening, uneven moisture extraction, and severe pathogen risks stem directly from improper equipment usage and poor airflow mechanics.
This guide provides a technical framework for operating a food dehydrator effectively. We break down the core mechanics of moisture extraction and evaluate hardware capabilities across different scales. You will learn how to match equipment to your production goals, establish strict pre-processing protocols, and scale your operations safely from prosumer setups to commercial levels.
Airflow and Thermodynamics: Successful dehydration relies on the precise balance of continuous airflow and controlled heat to extract moisture without cooking the product or sealing moisture inside (case hardening).
Equipment Scalability: Hardware selection directly dictates output quality; upgrading to an 8 layer food dehydrator or a commercial unit resolves the bottleneck of batch-size limitations and uneven drying.
Material Integrity: Utilizing a stainless steel food dehydrator mitigates the risks of plastic degradation, off-gassing, and bacterial retention during high-temperature or continuous operations.
Safety and Compliance: Strict adherence to temperature thresholds (e.g., 160°F+ for meats) and post-drying conditioning protocols is non-negotiable for long-term, pathogen-free storage.
The primary objective of dehydration is reducing water activity (aw) within the cellular structure of the ingredient. Water activity measures the available free moisture that supports microbial growth. Fresh fruits and meats typically have a water activity level above 0.95. Pathogens like Salmonella and mold require a minimum aw of 0.85 to 0.90 to proliferate. Successful dehydration drops this value below 0.60. Achieving this target inhibits microbial growth entirely while preserving the underlying cellular matrix. You must extract moisture steadily without degrading the nutritional compounds or collapsing the physical structure. In a production setting, operators use specialized aw meters to verify these levels before packaging. Relying on touch alone often leaves pockets of moisture exceeding 0.70 aw, which guarantees spoilage during ambient storage.
Airflow mechanics dictate the consistency of your final yield. Entry-level, round units rely on vertical airflow. These machines push air either bottom-up or top-down through stacked trays. Vertical systems create severe microclimates. Trays closest to the heating element dry rapidly, while trays furthest away remain humid. This design mandates continuous manual tray rotation, often requiring intervention every two hours. Furthermore, vertical airflow forces moisture and odors from lower trays directly into the food resting on upper trays, increasing the risk of flavor mixing.
Horizontal airflow systems utilize rear-mounted fans inside square or rectangular chassis. This design pushes heated air evenly across every tier simultaneously. Horizontal dynamics ensure uniform moisture extraction across all levels. You eliminate the need for manual tray rotation entirely. This configuration also maximizes usable tray surface area, allowing you to load ingredients edge-to-edge without blocking vertical air channels. The static pressure remains consistent across the entire cabinet, ensuring the top tray finishes at the exact same time as the bottom tray.
Dehydration relies on a specific thermodynamic cycle. Maintaining this continuous cycle prevents humidity buildup inside the chamber, ensuring steady capillary action draws internal moisture to the surface of the food. The mechanical process follows a strict sequence:
The intake fan draws ambient room air into the rear housing of the chassis.
The air passes over a coiled heating element, raising its temperature to the exact setpoint dictated by the thermostat.
Heating the air expands its capacity to hold moisture, dropping its relative humidity significantly.
The blower fan forces this heated, dry air horizontally across the loaded trays.
As the dry air makes contact with the food surface, it absorbs available moisture through rapid evaporation.
The system exhausts the newly humidified air out of the front vents or top exhaust ports.
Hardware control systems determine your operational accuracy. Analog dials utilize basic bimetallic thermostats. These components suffer from significant temperature drift. An analog dial set to 140°F may fluctuate between 125°F and 155°F during a single run. This variance compromises food safety when processing volatile ingredients or raw meats. Digital thermostats provide exact temperature maintenance. Digital controls use thermistors to monitor the internal ambient temperature constantly, pulsing the heating element to hold exact lethality temperatures. When processing jerky, a digital controller ensures the cabinet never drops below the required 160°F threshold.
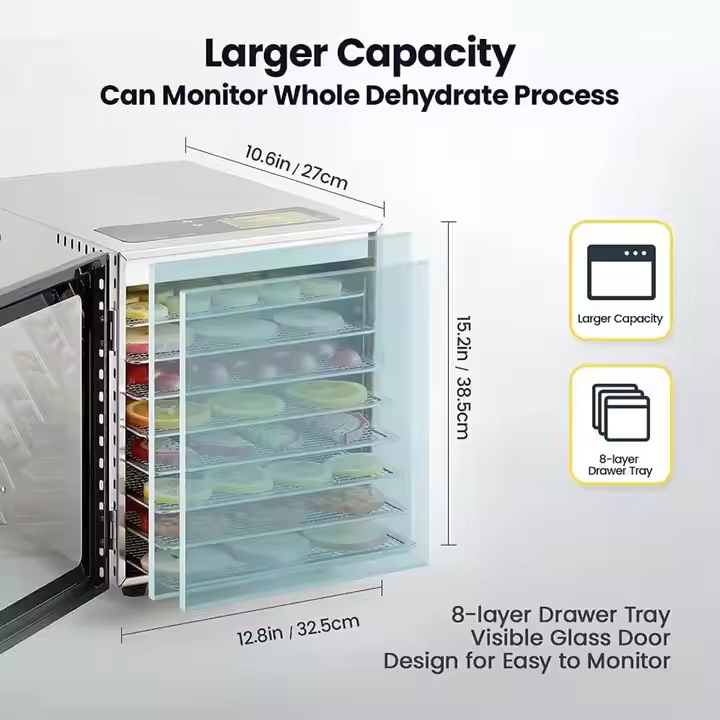
Scaling up production requires hardware that balances footprint with output capacity. Upgrading to an 8 layer food dehydrator offers an optimal capacity-to-footprint ratio for advanced home users, homesteaders, and small-batch producers. You gain enough surface area to process bulk harvests in a single run, typically handling up to 10 pounds of raw material. This tier of equipment introduces multi-zone loading capabilities. You can manage varying moisture contents simultaneously by placing thicker cuts near the primary airflow output and delicate items near the exhaust. This operational advantage drastically reduces total processing time across mixed batches.
Material selection impacts longevity and food safety. Plastic chassis components degrade over time, especially when exposed to acidic foods like citrus and tomatoes. High-temperature runs can also cause low-grade plastics to off-gas or warp, altering the structural integrity of the tray tracks. A stainless steel food dehydrator eliminates these risks. Stainless steel offers superior thermal mass, retaining heat efficiently and reducing the workload on the heating element. It resists acidic degradation entirely. Furthermore, stainless steel provides a non-porous surface, making it exceptionally easy to sanitize with standard commercial solvents. This material is a strict requirement for users prioritizing food safety compliance, continuous duty cycles, and long-term hardware survival.
Commercial scaling demands heavy-duty specifications. An industrial food dehydrator features programmable multi-stage temperature controllers, allowing operators to set complex drying curves automatically. For example, you can program the unit to run at 165°F for the first two hours to achieve lethality, then automatically drop to 130°F to finish the drying process without case hardening the product. These units utilize high-CFM (cubic feet per minute) exhaust fans to evacuate massive volumes of humid air rapidly. Automated humidity sensors monitor the internal environment, adjusting fan speeds to optimize the drying rate. Upgrading to 220V systems provides faster temperature recovery times after opening the doors, guaranteeing batch consistency for high-volume production facilities.
Equipment Tier Comparison and Production Capabilities
Equipment Tier | Airflow Type | Ideal Application | Average Raw Capacity |
|---|---|---|---|
Entry-Level Round | Vertical | Occasional hobby use, herbs | 2 - 4 lbs |
8-Layer Prosumer | Horizontal | Homesteading, trail meals | 8 - 12 lbs |
Stainless Steel Commercial | Horizontal (High CFM) | Jerky production, acidic fruits | 15 - 25 lbs |
Industrial 220V Cabinet | Horizontal (Automated) | High-volume retail production | 50+ lbs |
Moisture migration follows the path of least resistance. If you load uneven slices, the thinner pieces will over-dry and turn brittle, while the thicker pieces will retain internal moisture and spoil during storage. You must mandate uniform slice thickness across the entire batch. Utilize a mandoline or a commercial meat slicer to standardize dimensions. Set your commercial slicer to 3/16-inch for jerky and 1/4-inch for apples. Variations beyond 1/16-inch lead to a 20% difference in drying times. Consistent surface area optimization ensures predictable, standardized drying times and eliminates the need to pull individual pieces mid-run.
The dehydration process must focus on extracting internal cellular moisture, not evaporating surface water. Establish a strict rule: start with fresh, clean, and completely dry food. After washing or blanching ingredients, you must pat them dry using clean towels or run them through a commercial salad spinner. Loading dripping wet produce forces the machine to spend the first several hours merely evaporating surface water. This oversight extends run times, wastes energy, and creates a highly humid internal environment that delays the actual dehydration process.
Raw ingredients contain active enzymes that cause color degradation, flavor loss, and structural breakdown during the drying cycle. You must implement specific pre-treatment protocols to halt enzymatic activity before loading the trays.
Standard Pre-Treatment Protocols for Produce
Treatment Method | Target Ingredient | Process Duration | Primary Benefit |
|---|---|---|---|
Steam Blanching | Broccoli, Carrots, Green Beans | 3 - 5 minutes | Destroys enzymes without leaching vitamins. |
Water Blanching | Dense Root Vegetables | 2 - 4 minutes | Stops cooking process quickly when followed by ice bath. |
Ascorbic Acid Dip | Apples, Bananas, Peaches | 5 minutes | Prevents oxidation and severe browning. |
Citric Acid Solution | Light-colored fruits | 5 minutes | Alternative anti-browning agent. |
Overloading trays destroys airflow mechanics. You must adhere to the single-layer rule. Ingredients cannot overlap, touch, or stack. Maintain a minimum gap of 1/4 inch between individual pieces. Packing trays too densely creates localized micro-climates of high humidity. The air cannot pass between the food, forcing moisture to remain trapped against the surface. This restriction drastically increases total run time, ruins energy efficiency, and introduces a high risk of localized spoilage. When loading high-moisture items like tomatoes, increase the gap to 1/2 inch to account for the massive volume of water vapor released during the first two hours.
Drying herbs requires extreme thermal discipline. Herbs contain highly volatile essential oils responsible for their flavor and aroma profiles. Exposing these oils to high heat causes them to evaporate entirely, leaving behind tasteless, degraded plant matter. Operate your unit between 95°F and 115°F. This low-temperature range preserves the essential oils and prevents phototoxicity and color bleaching. Expect run times between 4 to 12 hours depending on ambient room humidity. You know the herbs are finished when the leaves crumble easily into a fine powder and the stems snap cleanly under light pressure.
Fruits and vegetables undergo significant cellular breakdown during dehydration. Set your thermostat between 125°F and 135°F to extract moisture efficiently without caramelizing the natural sugars. You must test the final product correctly to confirm the right moisture level. Fruits should be pliable and flexible, bending easily without tearing. Vegetables should be pushed past the pliable stage until they become completely brittle. If a dehydrated vegetable bends instead of snapping, it retains too much moisture for long-term storage. Allow the pieces to cool to room temperature for ten minutes before testing, as warm items often feel softer than they actually are.
Dehydrating meat introduces severe microbiological risks. You must follow strict USDA safety guidelines for lethality treatments. E. coli and Salmonella can survive low-temperature drying environments. You must ensure the meat reaches an internal temperature of 160°F (165°F for poultry). You can achieve this by pre-heating the meat in an oven or running the dehydrator at its maximum setting (160°F+) for the entire duration. Never start meat at a low temperature, as this creates an incubation zone for bacteria. Use curing salts like Prague Powder #1 in your marinades to provide an additional layer of protection against botulism spores during the drying cycle.
Recommended Temperature Frameworks and Success Indicators
Ingredient Category | Temperature Range | Success Indicator |
|---|---|---|
Herbs and Spices | 95°F - 115°F | Crumbles easily into powder; stems snap. |
Fruits | 125°F - 135°F | Pliable, leathery, no visible moisture pockets. |
Vegetables | 125°F - 135°F | Brittle, hard, shatters when struck. |
Meats (Jerky) | 160°F - 165°F | Bends without snapping, firm texture, white fibers visible. |
Case hardening occurs when you apply excessive heat to high-moisture foods too rapidly. The intense heat bakes the exterior surface, forming a hard, impenetrable shell. This shell traps internal moisture inside the cellular matrix. While the food feels dry on the outside, the trapped moisture will inevitably cause mold proliferation during storage. To mitigate case hardening, start your run at a moderate temperature rather than maximum heat. Allow steady capillary action to pull internal moisture to the surface naturally. Once the exterior feels dry to the touch, you can slightly elevate the temperature to finish the process. This stepped approach is highly effective for thick cuts of fruit like peaches or apricots.
Shared airflow systems carry volatile compounds from one tray to another. Drying pungent foods like onions, garlic, or heavily marinated jerky alongside delicate items like strawberries will ruin the fruit's flavor profile. Odor transfer is unavoidable in a sealed chassis. You must separate your batches by flavor profile. Dedicate specific runs entirely to alliums or meats. After processing pungent items, clean the interior walls, fan baffles, and trays thoroughly with a food-safe degreaser before loading neutral or sweet ingredients.
Removing food from the machine does not end the process. You must condition the yield. Conditioning equalizes the residual moisture across the entire batch, ensuring no single piece harbors enough water to trigger mold growth. Follow this exact protocol for safe storage:
Allow the dehydrated food to cool completely on the trays for 30 to 60 minutes.
Place the cooled goods into a loosely packed, airtight glass jar. Do not pack the jar tightly.
Store the jar at room temperature in a dark cabinet for 7 to 10 days.
Shake the jar daily to separate the pieces and redistribute moisture.
Inspect the glass for condensation. If moisture appears on the inside of the jar, return the entire batch to the dehydrator for another two hours.
Once conditioning is successful, transfer the goods to vacuum-sealed bags with oxygen absorbers.
Dehydrated ingredients require proper rehydration protocols for direct culinary integration. For vegetables, use a technical ratio of 1:1 or 2:1 boiling water to dehydrated product. Pour boiling water over the vegetables, cover the vessel, and let them steep for 15 to 20 minutes. This process restores their original cellular volume. You can drop dehydrated vegetables directly into simmering soups or stews without pre-soaking, as the ambient cooking liquid will rehydrate them naturally over 30 minutes. Rehydrate dried apples or berries in warm fruit juice before baking them into cobblers or pies to prevent them from absorbing moisture from your batter and throwing off your baking ratios.
Advanced operators utilize dehydration for high-yield specialty applications. You can assemble ultralight, calorie-dense backpacking meals by combining dehydrated starches, vegetables, and proteins. These custom meals weigh a fraction of their fresh counterparts and require only boiling water on the trail. Another high-value use case is producing single-ingredient, preservative-free pet treats. Slicing sweet potatoes into 1/2-inch thick chews or processing lean chicken breast into jerky provides premium, safe alternatives to heavily processed commercial pet snacks. By controlling the exact ingredients and drying temperatures, you eliminate the risk of chemical preservatives while maximizing the nutritional retention of the treats.
Effective dehydration demands treating your equipment as a precision instrument. Preparation, airflow dynamics, and strict temperature control dictate the safety, quality, and shelf life of your final product. Ignoring these variables leads to spoiled yields and wasted energy. When shortlisting equipment, align the hardware with your specific production volume. We recommend an 8 layer unit for serious hobbyists and trail-meal preppers who need multi-zone loading. A stainless steel model serves health-conscious users requiring maximum durability and sanitation. For commercial scaling, an industrial unit provides the necessary CFM and automated controls to guarantee batch consistency.
Take the following actions to optimize your dehydration process:
Audit your current production volume to determine if your existing hardware capacity creates a processing bottleneck.
Evaluate your control systems and upgrade from analog dials to digital thermostats if you process high-risk items like meat.
Standardize your pre-processing workflow by investing in a commercial slicer to guarantee uniform slice thickness.
Implement a mandatory 7-day glass jar conditioning phase for all dried fruits and vegetables before final vacuum sealing.
A: It depends on the airflow mechanics. Vertical airflow units push air from the bottom or top, creating uneven heat distribution. These require mandatory manual tray rotation. Horizontal airflow units push air evenly from the back across all tiers, eliminating the need to rotate trays.
A: Prevent case hardening by avoiding premature high-heat exposure. If the temperature is too high, the exterior dries into a hard shell, trapping moisture inside. Start at a moderate temperature (around 125°F to 135°F) to allow steady capillary action to draw internal moisture to the surface.
A: Yes. Stainless steel offers superior thermal mass, retaining heat more efficiently than plastic. It eliminates the risk of off-gassing at high temperatures, resists acidic degradation from foods like citrus, and provides a non-porous surface that is significantly easier to sanitize.
A: Dehydrating meat typically takes 4 to 8 hours depending on thickness and ambient humidity. Safety requires reaching an internal temperature of 160°F (165°F for poultry) to eliminate pathogens. You must maintain this high temperature consistently throughout the initial drying phase.
A: Conditioning equalizes residual moisture. Place cooled, dried food into an airtight glass jar, filling it loosely. Shake the jar daily for 7 to 10 days. If condensation appears on the glass, return the food to the dehydrator. If no moisture appears, it is safe for long-term storage.


